When you understand grid modes, you will see your music and your productivity getting better. In this video, I’m going to explain all the grid modes and some tricks to help you speed up your workflow. My name is Tiago Duarte, and welcome to DailyBeats where I help you master the software so that it’s just you and Music. If you are new to the channel, subscribe and activate the notifications so that you are up to date with all the videos I publish about music production. When I understood the snap modes, I became more productive with FL Studio. I was able to move notes, audio clips, and patterns to the correct position in the project. Sometimes I hear beats that some of you send me and one of the things that I see is that the instruments don’t all align correctly. Sometimes when we want to add swing or groove to beats, we move the notes around and out of the grid but if you are starting out, I would recommend first staying within the grid to understand it correctly. When you are more experienced, then you can experiment with going out of the grid modes to try things out. There are several Snap configurations across the FL Studio pages. You have a local Snap button on the Playlist, Paino Roll, and on the Event Editor. There is also a Global Snap panel that sets the snap value when the local snap is set to Main. When you change the local snap mode, you will see the grid lines change to display the size of the grid. For example, a whole note is a bar, and a quarter note is 1 beat.
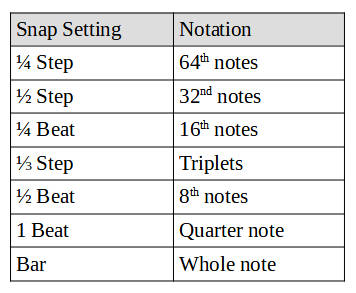
This table shows you the snap settings and associated note notation.

Visit our Merch Store.